In *Basketball Zero*, your zone and style combo are crucial in defining your gameplay strategy. Understanding the best zones and how they pair with different styles can significantly elevate your performance. Let's delve into a detailed tier list of all *Basketball Zero* zones and explore the most effective zone and style combinations.
All Basketball Zero Zones Ranked
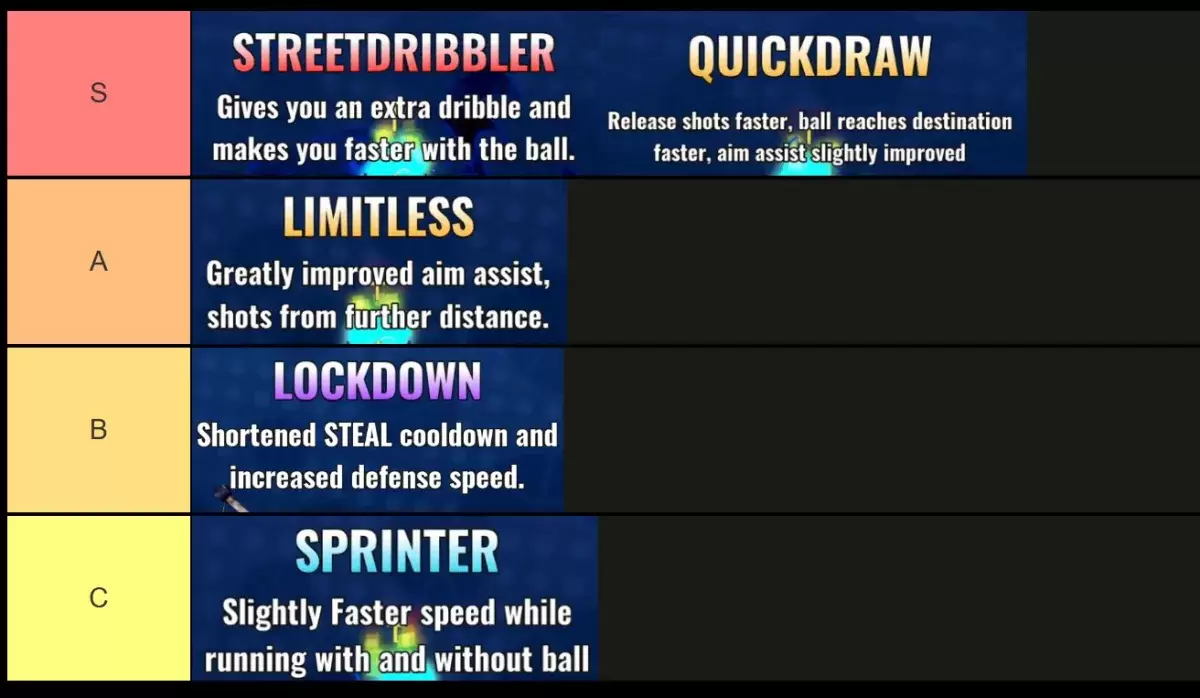 Image by The Escapist
When it comes to the best *Basketball Zero* zones, the strongest ones are **Street Dribbler, Quickdraw, and Limitless**, which shine brightly depending on your chosen **Style**. While **Sprinter** shows promise due to the critical importance of movement speed, it currently languishes in the lower tiers due to needing a buff. **Sprinter** and **Lockdown** are categorized in the lower tiers, but let's explore the reasoning behind each zone's placement and their ideal style combinations.
S-Tier Basketball Zero Zones
| **Name** | **Rarity and Roll Chance** | **Effects** | **Ranking Reason** | **Best Style Combo** |
| **Street Dribbler** | *Mythic (0.5% or 5% Lucky Odds)* | • Grants an extra dribble charge • Increases speed while carrying the ball | The extra dribble charge is the best defensive tool in the game, and the enhanced speed with the ball helps you reach the hoop faster, often bypassing defenders. This makes **Street Dribbler** the top zone in *Basketball Zero*. | Star or Ace |
| **Quickdraw** | *Legendary (2% or 45% Lucky Odds)* | • Speeds up shot release • Enhances shot and pass speed • Provides slight aim assist | **Quickdraw** is second only to Street Dribbler because faster shot release makes your shots harder to block, and quicker passes improve your gameplay flow. The aim assist is a great aid, especially for players mastering the shooting mechanics. | Ace or Phantom |
A-Tier Basketball Zero Zones
| **Name** | **Rarity and Roll Chance** | **Effects** | **Ranking Reason** | **Best Style Combo** |
| **Limitless** | *Legendary (2% or 45% Lucky Odds)* | • Provides significant aim assist • Extends shooting range | The extended shooting range is a powerful asset, and the aim assist greatly benefits beginners. However, as you become more skilled, the reliance on aim assist diminishes, positioning **Limitless** firmly in A-Tier. | Sniper or Ace |
B-Tier Basketball Zero Zones
| **Name** | **Rarity and Roll Chance** | **Effects** | **Ranking Reason** | **Best Style Combo** |
| **Lockdown** | *Epic (35% or 50% Lucky Odds)* | • Reduces ball steal cooldown • Boosts defense speed | This zone excels with **Phantom** for frequent steals and support, and with **Ace** or **Star** for carrying the team. While not as powerful as S and A-Tier zones, **Lockdown** remains a solid choice. | Phantom for Support and Ace or Star for Carrying |
C-Tier Basketball Zero Zones
| **Name** | **Rarity and Roll Chance** | **Effects** | **Ranking Reason** | **Best Style Combo** |
| **Sprinter** | *Rare (62.5%)* | • Slightly increases speed with and without the ball | The potential for **Sprinter** to climb to A-Tier is high because speed is vital for both stealing and scoring. However, its modest speed boost relegates it to C-Tier, though it can be B-Tier in specific scenarios. | All Except Sniper |
That concludes my comprehensive *Basketball Zero* zones tier list. Be sure to check out our *Basketball Zero* codes for free regular and lucky spins to enhance your gameplay further.